Quickstart
Installation for Beta Users
Select your computer’s operating system:
After download, rename the executable as wht and move the file to folder:
Linux:
/usr/local/binMacOS:
/opt/homebrew/binWindows:
C:\Program Files\
Make sure that PATH enviornment variable includes the location where you moved wht.
Connection Profile
Data warehouse credentials and connection details are specified in the connection profile, which is stored in siteconfig.yaml, under the YAML node profiles. You can create it using this command:
wht init profile
This will ask you to input connection details and will then store them in the file siteconfig.yaml inside .wht folder of user’s home directory (~/.wht). To get the connection details, please login to your data warehouse and note down the following:
Account: An example is abx182.us-east-2. To know about account identifier, click here.
Role: Such as ANALYTICS_ROLE, PUBLIC, etc.
Database name
Schema
Warehouse
User
Password
Note
To enable access, make sure you are an ACCOUNTADMIN, or have an account that has READ and WRITE privileges.
Hello ID Stitching
What is ID Stitching?
ID Stitching solves the problem of tying different identities together, for the same user across different sessions/devices.
Create a Project
Instantiate Hello World project using wht init wht-project. This will create a seed project in folder HelloWhtProject.
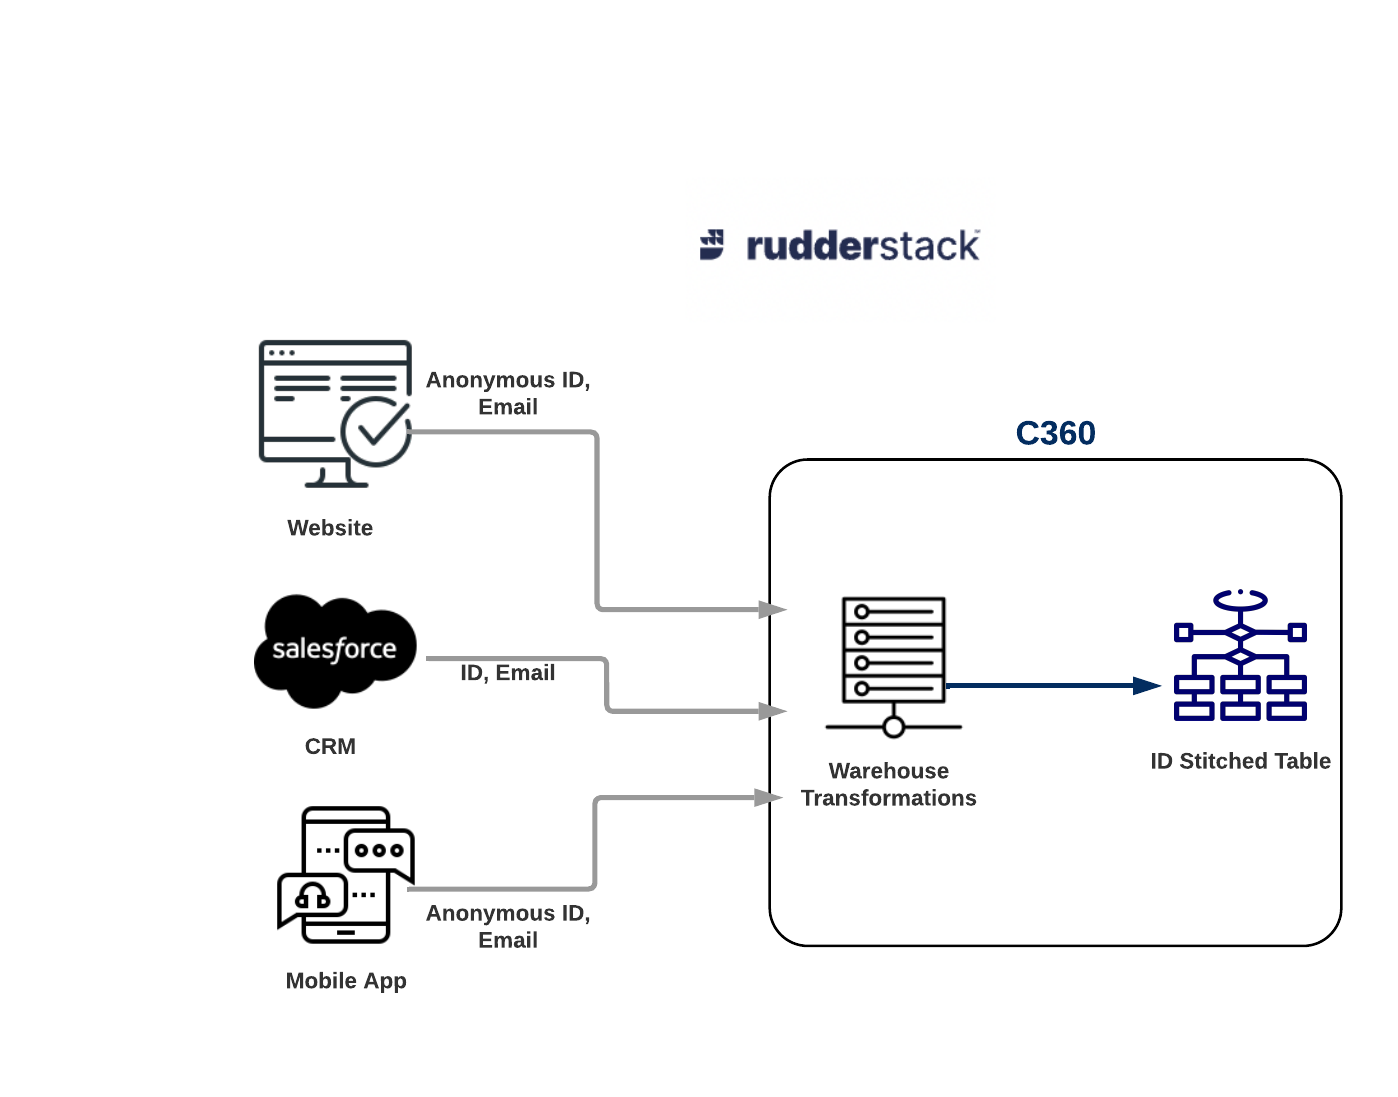
Consider that in your data warehouse, you have data coming in from various sources. Such as, public website, mobile app and SalesForce CRM. You want to know about the ID’s of users who browsed the website in private mode. You can get the missing links, by stitching the same fields together.
For that, edit the following files in folder HelloWhtProject.
wht_project.yaml- Give name of your project and the DW profile you are going to use. For instance, you can name your project asprodwhich will connect to profiletestdbwith model files stored in subfoldermodels.
A sample project file is shown below:
name: id-stitcher-sample # Project name
profile: testdb # The connection profile to be used
model_folders:
- models # Name of subfolder inside your project folder, which contains YAML model files
models/ml_features.yaml- The sample model file generated targets creation of a feature table. Since, we are currently interested in ID Stitcher, you can delete this file.models/id_stitcher.yaml- Download this file from here and customise these fields:
validity_time - Fetch data which was loaded upto this timestamp.
types - The type of data that can come via ID Stitching.
filters - Filter(s) that the type should go through before being included. Filters are processed in order. Current filters enable one to include / exclude specific values or regexes.
inputs - List of all input sources along with SQL for fetching them.
name - Give a name in which you will store the fetched data.
ref - Table in DW you are fetching from, along with timestamp column.
ids - List of all the ID’s that will be fetched.
sql - These are ID Stitching Inputs that compute column expression for knowing the ID of each row in the table.
type - These are IdEdgeSignals i.e. fields in different tables that are of same type, so they can be stitched together.
Note
For more information on validity_time, check out the section Timestamp of WHT model inputs on the page WHT Project.
A sample model file is shown below:
resources:
domain_profile:
  entity_key: user
  resource_type: id_stitcher
  resource_spec:
    validity_time: 24h # 1 day
      id_types:
        types:
          salesforce_id:
            filters:
              - type: exclude
                value: ""
              - type: exclude
                value: "na"
          rudder_anon_id:
          email:
            filters:
              - type: include
                regex: "[A-Za-z0-9+_.-]+@(.+)"
      inputs:
        # For every input model, we need to know the column expression which gives identity of each row in the column.
        - name: websitePageVisits
          ref: { table: autotrack.pages, timestamp_col: timestamp }
          ids:
            - sql: "anonymous_id"
              type: rudder_anon_id
            - sql: "case when lower(coalesce(context_traits_email, user_id)) like any ('%gmail%', '%yahoo%') then lower(coalesce(context_traits_email, user_id))  \
                   else split_part(lower(coalesce(context_traits_email, user_id)),'@',2) end"
              type: email
        - name: salesforceContact
          ref: { table: salesforce.contact, timestamp_col: createddate }
          ids:
            - sql: "id"
              type: salesforce_id
            - sql: "case when lower(email) like any ('%gmail%', '%yahoo%') then lower(email)  else split_part(lower(email),'@',2) end"
              type: email
        - name: webappIdentifies
          ref: { table: webapp.identifies, timestamp_col: timestamp }
          ids:
            - sql: "anonymous_id"
              type: rudder_anon_id
            - sql: "case when lower(coalesce(context_traits_email, user_id)) like any ('%gmail%', '%yahoo%') \
                   then lower(coalesce(context_traits_email, user_id))  \
                   else split_part(lower(coalesce(context_traits_email, user_id)),'@',2) end"
              type: email
Here are the fields you can customise:
domain_profile: Change this to name of the feature table created on the DW.resource_type: The valye of this key should be set to id_stitcher.validity_time: Specify the duration of loaded data from Warehouse that is to be fetched. Say you want to fetch all data that has been loaded in the last 1 day, so set this value to 24h.types: Define what kind of data can come, via ID stitching. This is the SQL field that data belongs to, and is not the same as column type (such as char or int). You can also apply afilteron this, to include or exclude a certain type of data.inputs: Here you can define all the source inputs along with the output data field. Givenameof output field from reference table (ref), map as per table field or fetch clause (ids:sql) and the data type (ids:type).The primary key
pkshould be specified if the number of Ids specified is more than 4 in thesqlfield while mentioningids.
Note
For detailed reference, check out the page Identity Stitching.
Creating ID Stitched Table
After saving the edited file, execute wht run -w HelloWhtProject command to materialize the ID stitcher table. On screen you’ll be able to view the table name created on the data warehouse.
Hello Features Table
What is Features Table?
Feature is a single value derived by performing calculation or aggregation on a set of values. A Features Table is a collection of all such features.
Modify ID Stitched Project
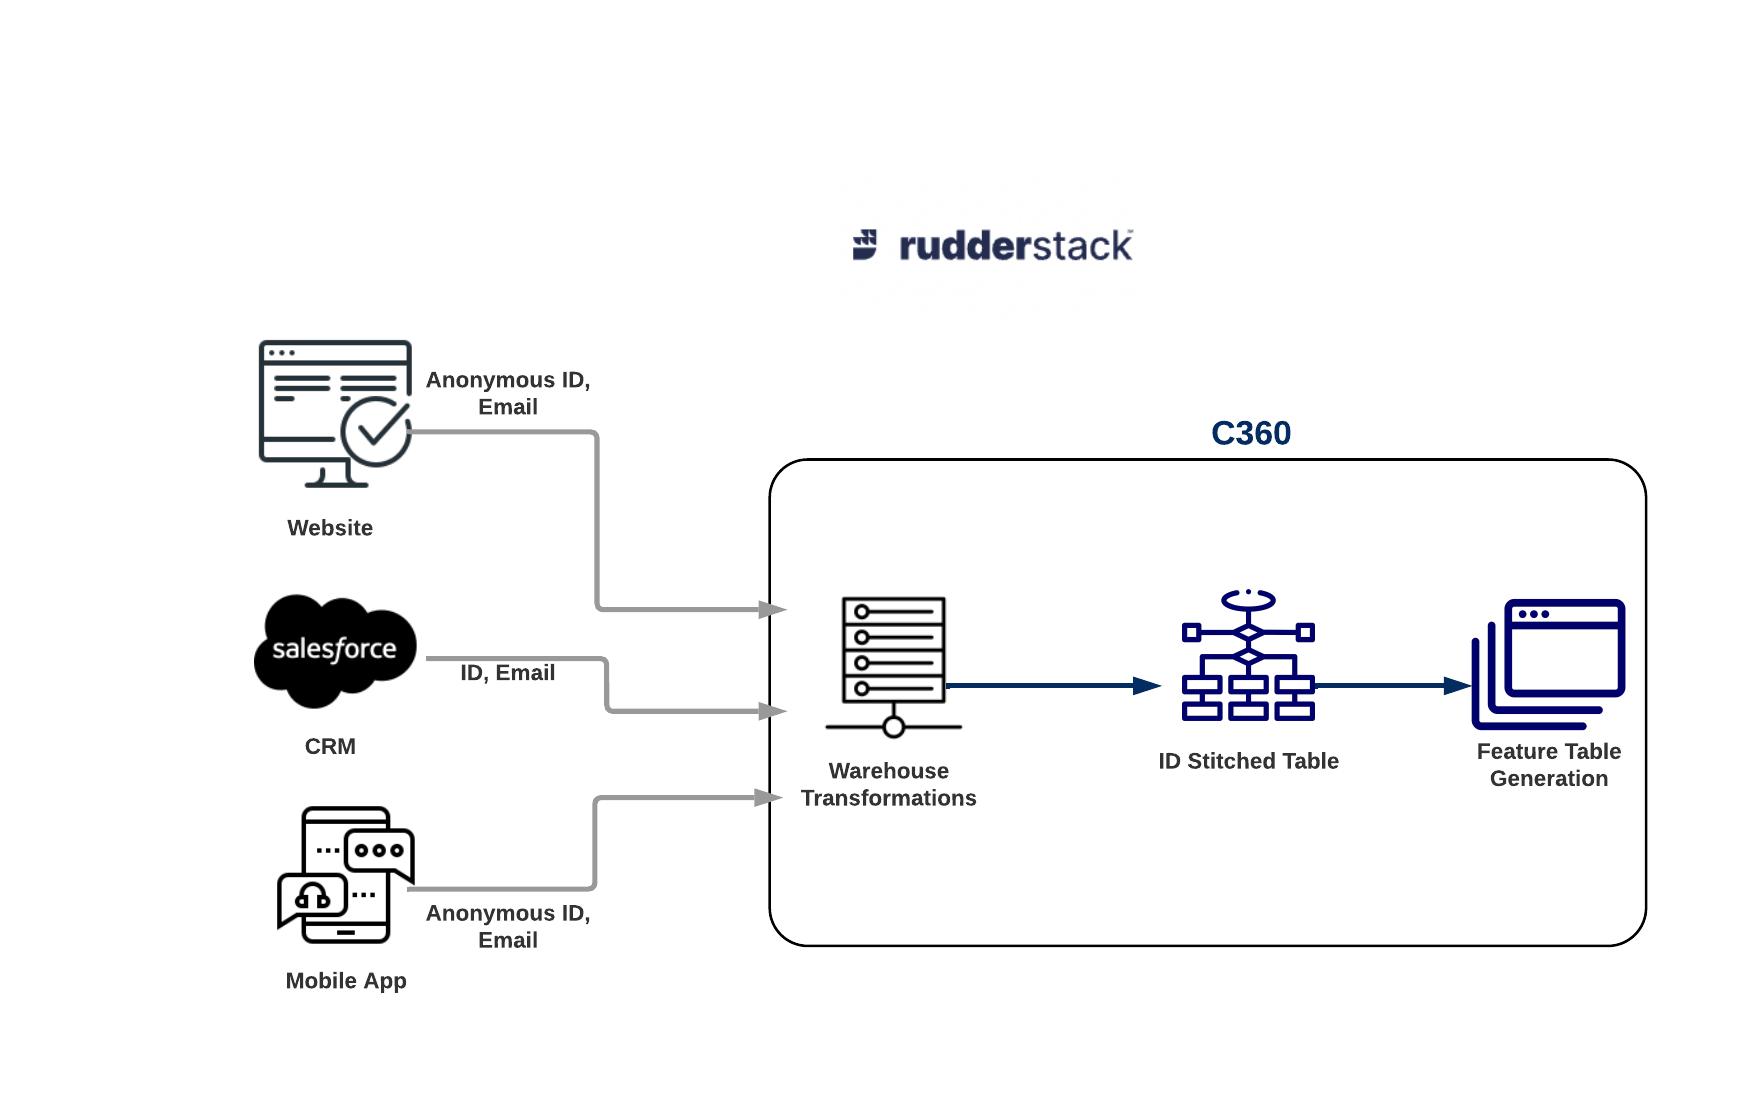
Let’s extend the previous example, where input data got stitched. Now, on top of that table, you want to get a feature table created with these features:
Ignore a domain for analysis.
Date and time the customer was converted.
Source of lead (Campaign name).
Number of days a customer has been active.

Similar to ID Stitching, create your first WHT feature table using wht init project.
After changing fields for ID stitching, navigate to the section starting with features, a sample of which is shown below:
....
features:
- tablevar:
    name: blacklistFlag
    table: blacklistDomains
    filter: (context_sources_job_run_id = (select top 1 context_sources_job_run_id from blacklistDomains order by timestamp desc))
    value: max(case when exclude_reason is not null then 1 else 0 end)
- tablevar:
    name: domainSummary_account_type
    table: domainSummary
    value: domainSummary.account_type
- feature:
    name: ignore_domain
    value: max(case when blacklistFlag = 1 or domainSummary_account_type like '%free%' then 1 else 0 end)
    description: Whether a domain should be ignored for the analysis
- macro:
    name: call_conversion
    value: type = 'Call' or tasksubtype='Call' or type like '%demo%') and \
          (rlike(lower(subject), '.*\\bcall\\b.*') or rlike(lower(subject), '.*\\bdemo\\b.*'
- tablevar:
    name: salesCallEventTime
    table: salesforceTasks
    value: min(activitydate)
    filter: macro(call_conversion)
- feature:
    name: sales_conversion_timestamp
    value: salesCallEventTime
- tablevar:
    name: campaign_name_var
    table: identify
    value: campaign_name
    filter: signup = true
- feature:
    name: campaign_name
    value: campaign_name_var
    filter: ignore_domain = 0
- tablevar:
    name: active_days_var
    table: tracks
    value: count(distinct to_date(timestamp))
- feature:
    name: active_days
    value: active_days_var
Here are the fields you can customise:
resource_type: This should be set to feature_table_model.id_stitching: This key should be set, which will haveid_typesandinputs.tablevar: This is the Input ID, i.e. the sourcetableand thevalueby which you are computing, storing the result inname.
You can also apply a
filteron this, as a SQL like clause.To apply a regular expression in computing a value, you can apply a
macro.You can have more than one
tablevarin computing the Input ID.
Then, you can store it in a
featurewith thenameas Canonical ID.
Further, you can apply a
filterto it or an aggregation-basedvalue.Optional, a
descriptionof the computed feature.
Note
For detailed reference, check out the page Feature Tables.
Creating Features Table
After saving the edited file, execute wht run -w HelloWhtProject command to materialize the Features Table. On screen you’ll be able to view the table name created on the data warehouse.
Viewing Generated Tables
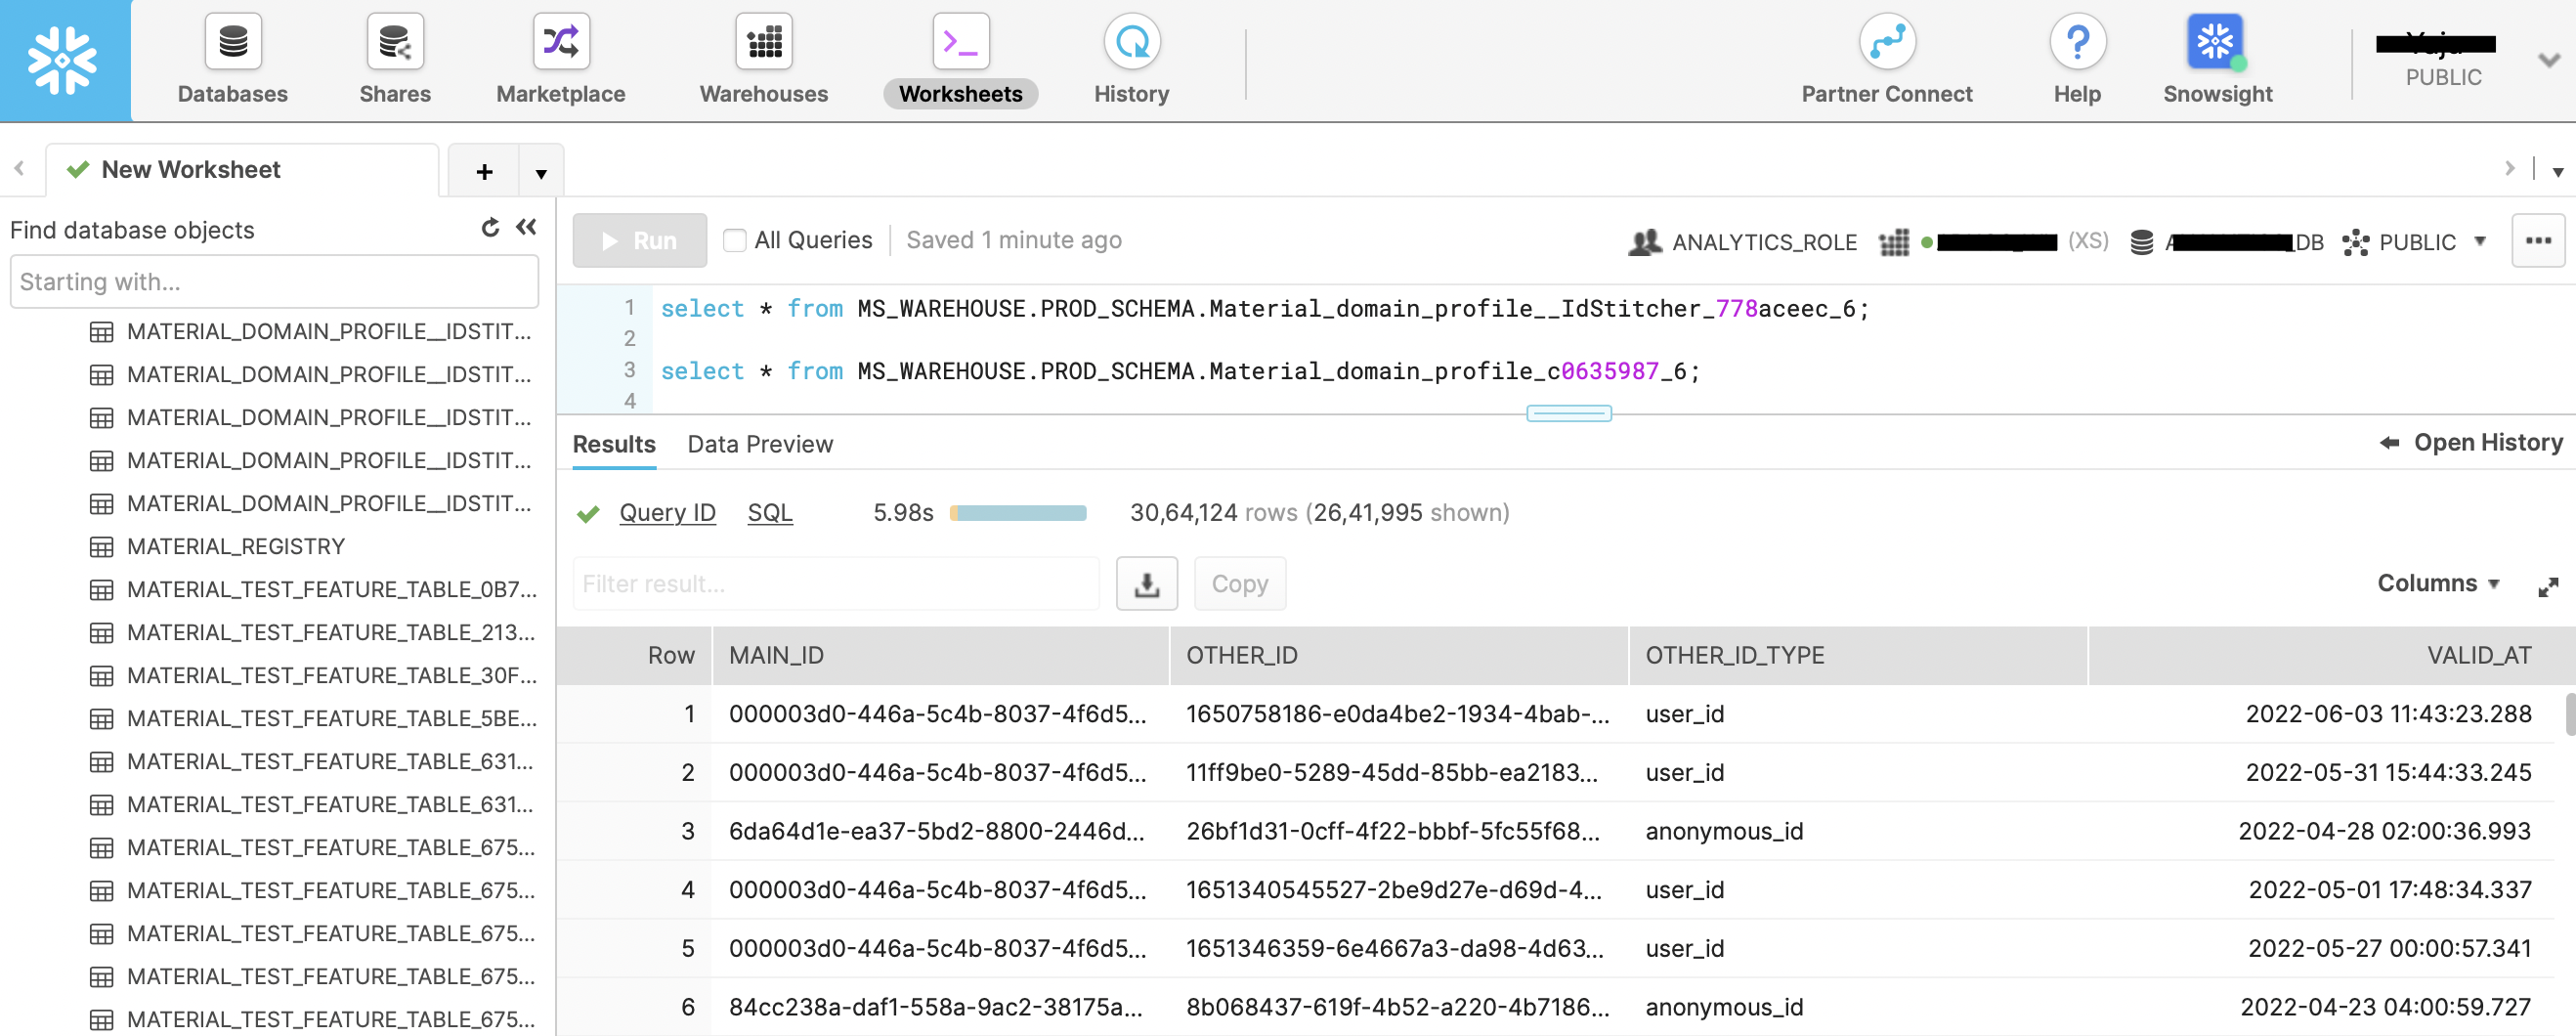
Here’s how you can login to Snowflake web console and view the created tables:
Open https://<account>.snowflakecomputing.com/console.
Enter your username and password.
Click on Worksheets in top navigation bar of the webpage.
On the left sidebar, you can click on the Database and the corrosponding Schema to view list of all tables.
Hovering on each table name will show you the full table name along with date and time it was created.
You can double click on the appropriate table name to paste the name on empty worksheet.
Then, you can prefix
select * frombefore the pasted table name and suffix;at the end.Press Cmd+Enter, or click on Run button to execute the query.
Scheduling WHT Runs
This page is under construction.
By making your WHT Project as a GIT Repository, you can seamlessly collaborate with your team mates, with modular control over your model files. Check out this link on making your project available as a GIT Repo.
Follow these steps to configure WHT from the RudderStack web app.
On the left side navigation bar, click on ‘Enhance’, then ‘WHT Project’.
On top right, click on the button ‘Create a new project’. Enter the Project name and description.
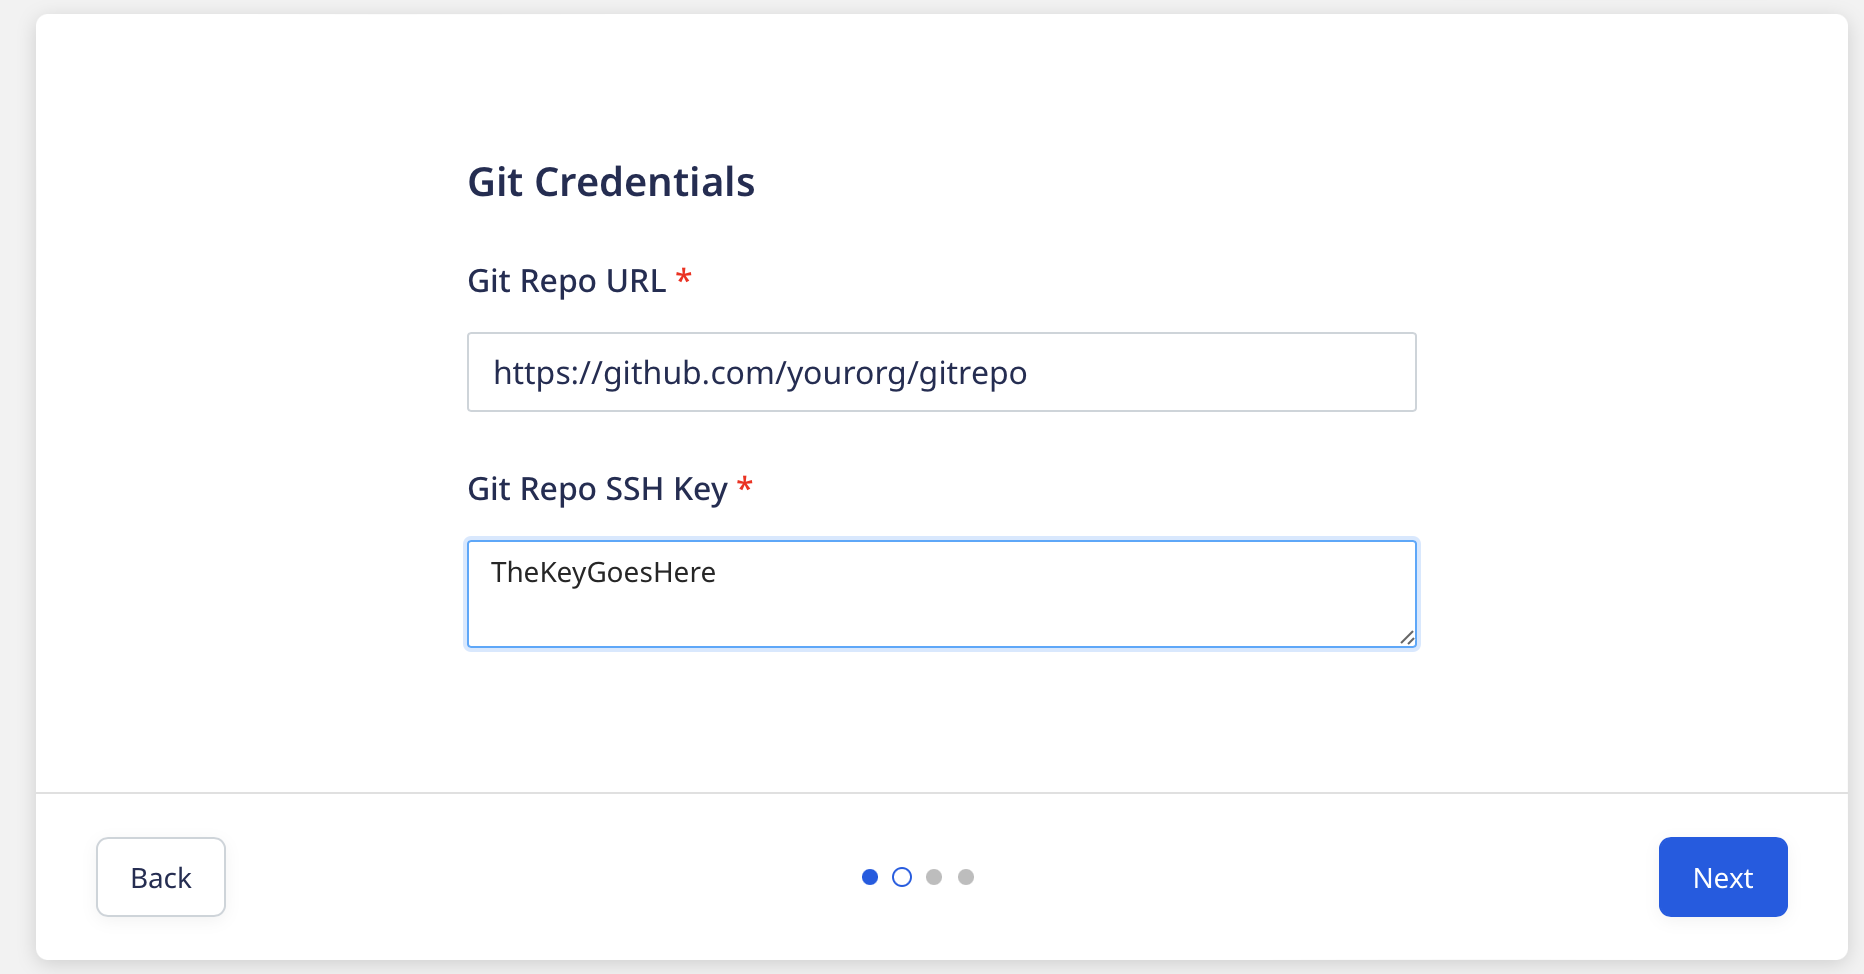
Next, enter the GIT Repo URL along with GIT Repo SSH key.
You now will have to enter data warehouse information like: Profile, Account, Database, Warehouse, User, Password, Schema, Role, Choose Cloud.
Next, it’ll do warehouse validations to check if credentials are correct or not.
Now you can define the interval at which to automatically run the repo. Like if you want to run every 15 minutes or every 1 hour, etc.
After creating project, we will see it in list, along with all the past runs that have taken place. We can schedule to run it say every 15 minutes.
If any error message is there then it’ll be displayed on screen when you click on link in the list.
Data Warehouse has the material test feature table and ID stitcher table.